This section describes how the derived Spectral Blueing operator can be applied to your data. Application of the Spectral Blueing operator can be done in various ways. The easiest way is to apply the Spectral Blueing operator from within SsbQt.
Application of the Spectral Blueing operator is achieved via the Apply Operator dialog. This can be popped up by either clicking the menu item or clicking the  icon within the SsbQt main window.
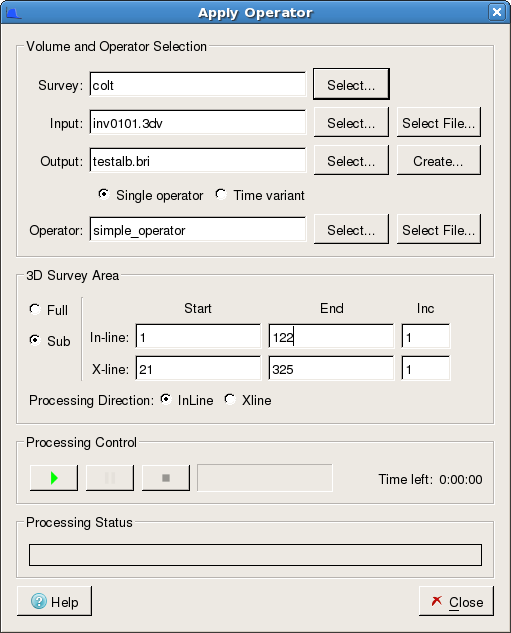
The list below describes how you specify the various parameters to the Process controller to generate a Spectral Blueing volume.
Survey
Clicking the push button will pop-up a Survey selection dialog. (if run in an OpenWorks R5000 environment, but if in a 2003.12 environment this input item will not exist). If you have derived a Spectral Blueing operator immediately before this step then the Survey used in the design will be displayed here as the default.
Input
Clicking the push button will pop-up a seismic volume selection dialog. Here you can, with the aid of a filter, locate the input seismic volume that is to be processed. If you have derived a Spectral Blueing operator immediately before this step then the seismic volume used in the design will be displayed here as the default.
Output
Clicking the push button will pop-up a seismic volume selection dialog. Here you can select an existing output volume to overwrite. Alternatively, you can click the push button to pop up a dialog to create a new seismic volume. Here you specify Output volume name. You can also specify an existing volume to be used as a template together with name and other specific volume creation parameters. For example, if you are running in a SeisWorks environment you will need to specify the volume type (3dv, bri or cmp).
Single Operator
Checking this radio button allows you to select a single operator to be used in the colored inversion process. By default, the Single Operator radio button is checked.Time Variant
Selecting the Time Variant radio button applies operators defined in Time Variant tab.
Operator
Clicking the push button will pop-up an operator selection dialog. Here you can select the operator to be used in the Spectral Blueing processing. If you have derived a Spectral Blueing operator immediately before this step then the seismic operator generated during the design phase will be displayed here as the default. Operator parameter is not applicable if you have selected Time Variant radio button.
3D Survey Area
Here you can specify the In-line and X-line range of the seismic data to be processed. By default the full In-line/X-line range will be processed.
Processing Control
The processing control consist of a
 (start) icon. Clicking this icon will pop-up a "Confirm" dialog to warn you that you are about to overwrite a seismic data volume. Clicking the push button on this dialog confirms you are happy for this action to happen.